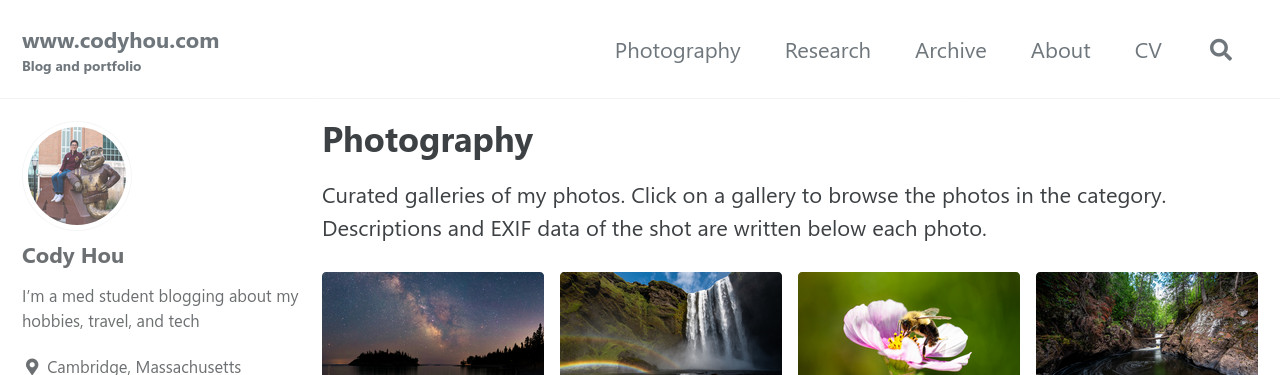
Creating a Blog and Portfolio on GitHub Pages with the Minimal Mistakes Theme
Several months ago I was motivated to create a website to host my photography portfolio and practice my writing through blogging. I have been very pleased with using GitHub Pages and the Minimal Mistakes theme to craft my site.
Why?
Even as someone who doesn’t have a great deal of experience creating websites from scratch, I think GitHub Pages is a great website host for a personal blog and portfolio.
- Pros: You get basically full control of how your website works, and GitHub gives a generous traffic and storage allowance for free. GitHub takes care of the website hosting (no server network/firewall troubleshooting required). In this guide I will be using Jekyll, a static website generator, that seamlessly converts markdown documents to posts. A huge collection of themes exist for Jekyll-based websites aside from Minimal Mistakes, and it’s easy to switch between Jekyll themes.
- Cons: The learning curve to hosting a website on GitHub Pages is higher than that of something like WordPress, SquareSpace, or Google Sites. Also, in the free tier of GitHub, your website repository is free for the public to see and copy (and any previous commits can be recovered). (The latter con can be avoided if you host the website on a personal server, but that takes more work.)
Base Configuration
There are multiple ways to set up the website. While you can build the Jekyll website from scratch, I prefer to use the templates provided by Minimal Mistakes’ creator, Michael Rose. Feel free to consult my GitHub repository for my website configuration.
- Create a GitHub repo named
[your username].github.io(see documentation if you need help). Adding aREADMEand.gitignoreare not necessary. Clone the repo to your computer. -
Clone the Minimal Mistakes repo from GitHub to your computer. Copy the following folders and files into the GitHub repo you cloned to your computer in step 1. These documents contain reasonable defaults.
_data/_config.ymlGemfileindex.html.gitignore
-
Edit
Gemfileby commenting everything else and then adding the following.gem "github-pages", group: :jekyll_plugins gem "jekyll-include-cache", group: :jekyll_plugins gem "webrick" - If you want GitHub emoji support on your website (such as
 ), add
 gem "jemoji"undergroup :jekyll_plugins do. -
Now we can start adding personal details to the website. Begin by editing
_config.ymlin the root directory.- We need to tell GitHub Pages which theme we’re using. Uncomment the line with
remote_themeand tell it to use the current stable release (as of this post, 4.24.0) by changing the theme text to"mmistakes/minimal-mistakes@4.24.0". - You now add a site title, your name, site description, the name of your GitHub repository, etc. A full explanation of each setting can be found here.
- To add additional link icons under the author profile strip on the left side, search through v5 FontAwesome icons and copy the class string.
- If you added the GitHub emoji plugin in the previous step, you will need to add it under
plugins:. -
You can change the default template of how certain layout work under
defaults:. By default the main pages (e.g. on my website, Photography, Research) do not show the author profile sidebar on the left, so I added the following to enable this:# _pages - scope: path: "" type: pages values: layout: single author_profile: true - You can also add collections, which are ways to consolidate content that looks good in a portfolio (e.g. my photography page is a collection). More detailed instructions are here.
- We need to tell GitHub Pages which theme we’re using. Uncomment the line with
- We could push the website repo to GitHub every time we want to see how our changes are reflected, but it takes about ~2 minutes for GitHub to publish the new website. Instead, the best way to test changes to the website is by installing Ruby, Jekyll, and Bundler, which will allow the website to be built and hosted locally. The Jekyll install page has really good documentation on how to install Ruby. For Bundler, run
gem install bundlerafter installing Ruby. - Change into your repo and run
bundle installto properly install the Ruby gems. - To host the site locally, run
bundle exec jekyll serveand navigate to http://localhost:4000/. Your site should be now be live! -
Now you can customizing the website layout and add posts with your content.
-
The website page structure is dictated in
_data/navigation.yml. Create a_pagesfolder that correspond to the pages listed in_data/navigation.yml. These pages will show in the top bar. Pages are markdown files that begin with the following generic header (the following is for my “About Me” page):--- title: "About Me" layout: single permalink: /about/ --- -
Markdown posts can be added under a
_posts/folder. Posts begin with the following generic header (the following is the header for this post):--- title: "Creating a Blog and Portfolio on GitHub Pages with the Minimal Mistakes Theme" date: 2023-02-05 last_modified_at: 2023-02-05 tags: - Guides header: image: /assets/images/headers/2023-02-05-blog-portfolio-with-mm-header.jpg teaser: /assets/images/headers/2023-02-05-blog-portfolio-with-mm-header.jpg --- - Copy
_includes/head/custom.htmlfrom the Minimal Mistakes repo to configure and add favicons (follow the link in that HTML document). - I store all assets (images, documents, etc.) in a folder called
assets. I recommend resizing large images, especially if you plan to add them to your blog posts, so you don’t immediately exceed the GitHub storage limit. I resize my images to 1280 px on the long size.
-
- When you are done editing and writing pages/posts, commit and push the respository and marvel at your new custom website.
Teaser Images on the Home Page
Minimal Mistakes does not show teaser images of posts by default on the home page, which is a bit too minimalistic for me. To change this, first copy _includes/archive-single.html to your repo, which contains the following piece of code to display teasers with grid view:
{\% if include.type == "grid" and teaser \%}
  <div class="archive__item-teaser">
    <img src="{{ teaser | relative_url }}" alt="">
  </div>
{\% endif \%}
Modify the first line to check if the grid type is also a list.
{\% if (include.type == "grid" or include.type == "list") and teaser \%}
Although the header images are now showing, the spacing is too close for my liking. To fix this I change some settings in the Sass files by adding some space below the excerpts for each post. Copy the entire _sass/ folder from the Minimal Mistakes repo. In _sass/minimal-mistakes/vendor/_archive.scss I modify .list__item to look like the following:
.list__item {
  .page__meta {
    margin: 0 0 4px;
    font-size: 0.6em;
  }

  .archive__item-title {
    margin-top: 0.25em;
  }

  /* Add 2em of space under excerpts */
  .archive__item-excerpt {
    margin-bottom: 2em;
  }
}
This gives me enough spacing between posts but you can adjust the em value to your liking. I think teaser images add a lot of visual interest to the home page. I size my teaser images to 1280 px by 375 px.
Linking a Custom Domain
While [username].github.io is fine, a personal blog wouldn’t really be complete without a custom domain. I use Google Domains, which are cheap and easy to set up. My .com domain costs $12 a year. You can get fancy with the endings if you want! Once you get your domain, follow GitHub Pages’ documentation on how to set up the domain for your website.
Using a Google-managed domain is great because it ties well with search engine optimization (SEO) on Google, which is important if you want your website to be found by others. Through the Google Search Console you can easily and quickly obtain an SEO hash which goes under the google_site_verification line in _config.yml.